
trueSpace render engines
trueSpace7.6 is offering 6 render engines : Lighworks and Virtualight are native in Modeler side, 3Delight is fully integrated via the Dibble plugin, V-Ray can run both from Modeler and Workspace sides, Yafaray runs via a Workspace plugin and the real-time DirectX is available in the Workspace side.
Lightworks

Lightworks is trueSpace’s historical render engine. All the shaders, lights and special effects of Modeler side are designed to work with this renderer. Also, most of the shader plugins such as ShaderLab will work in this native renderer only.
trueSpace7.6’s Lightworks is supporting HDRI/LDRI and allows ambiant occlusion effects.
Lightworks is fast, versatile, extremely good at technical rendering because is creates very accurate material aspects and precise shadows. Via the ShaderLab extension, you can finely bake your texture and create realistic material.
To use Lightworks, there is nothing special to do : it is the render engine by default ! Just clic the Model tab of the main window to make sure you are working in the Modeler side of trueSpace7.6
To render something, just clic the Render icon (by default located at the left of the top-right toolbar). All the render options are driven with icons, located on the vertical toolbar on the right side of your 3D space. Make sure you have some light in the scene or you objects will be rendered all black !

Virtualight


Virtualight is trueSpace’s historical first third party renderer supporting global illumination.
This is an outdated renderer though and is not taking advantage of today’s CPUs dedicated rendering processes : it is rather slow, even with simple scene.
It is good to have it for experiment, but it may not be suitable for any professional work when time matters.
To use Virtualight, simply open the Preferences panel (Clic the tS6_Files menu to open it) and choose Virtualight as Render Engine. You will get Virtualight options panel with a right-clic on the Render icon.

3Delight

3Delight renderer is a powerful render engine designed for animation rendering. It is fast, offers very interesting lightening effects, supports fur and displacement mapping. Although it runs as a plugin, its integration into trueSpace’s interface is complete and requires no external interface.
Download the installation files HERE, then follow the installation process :
- Start 3delight-10.0.4-setup.exe
This will install the 3Delight render engine engine on your computer. - Start Dribble1.04wip080808_setup.exe
This will create a dribble folder in your tS/tsx plugins folder. It will also copy some files in your trueSpace directory but also in 3delight’s directory. - Open the « 3delight shaders for tS » directory, and copy all its files into your c:/Program Files (x86)/3delight/shaders directory.
These are special 3delight shaders that work with trueSpace. If you don’t copy these files, your objects will be rendered all grey. - Copy dribble1.05wip101813_ts6or7.tsx file in your tS/tsx/dribble directory
This file is the latest version of Dribble, made by Clinton. - Restart your computer (important!)
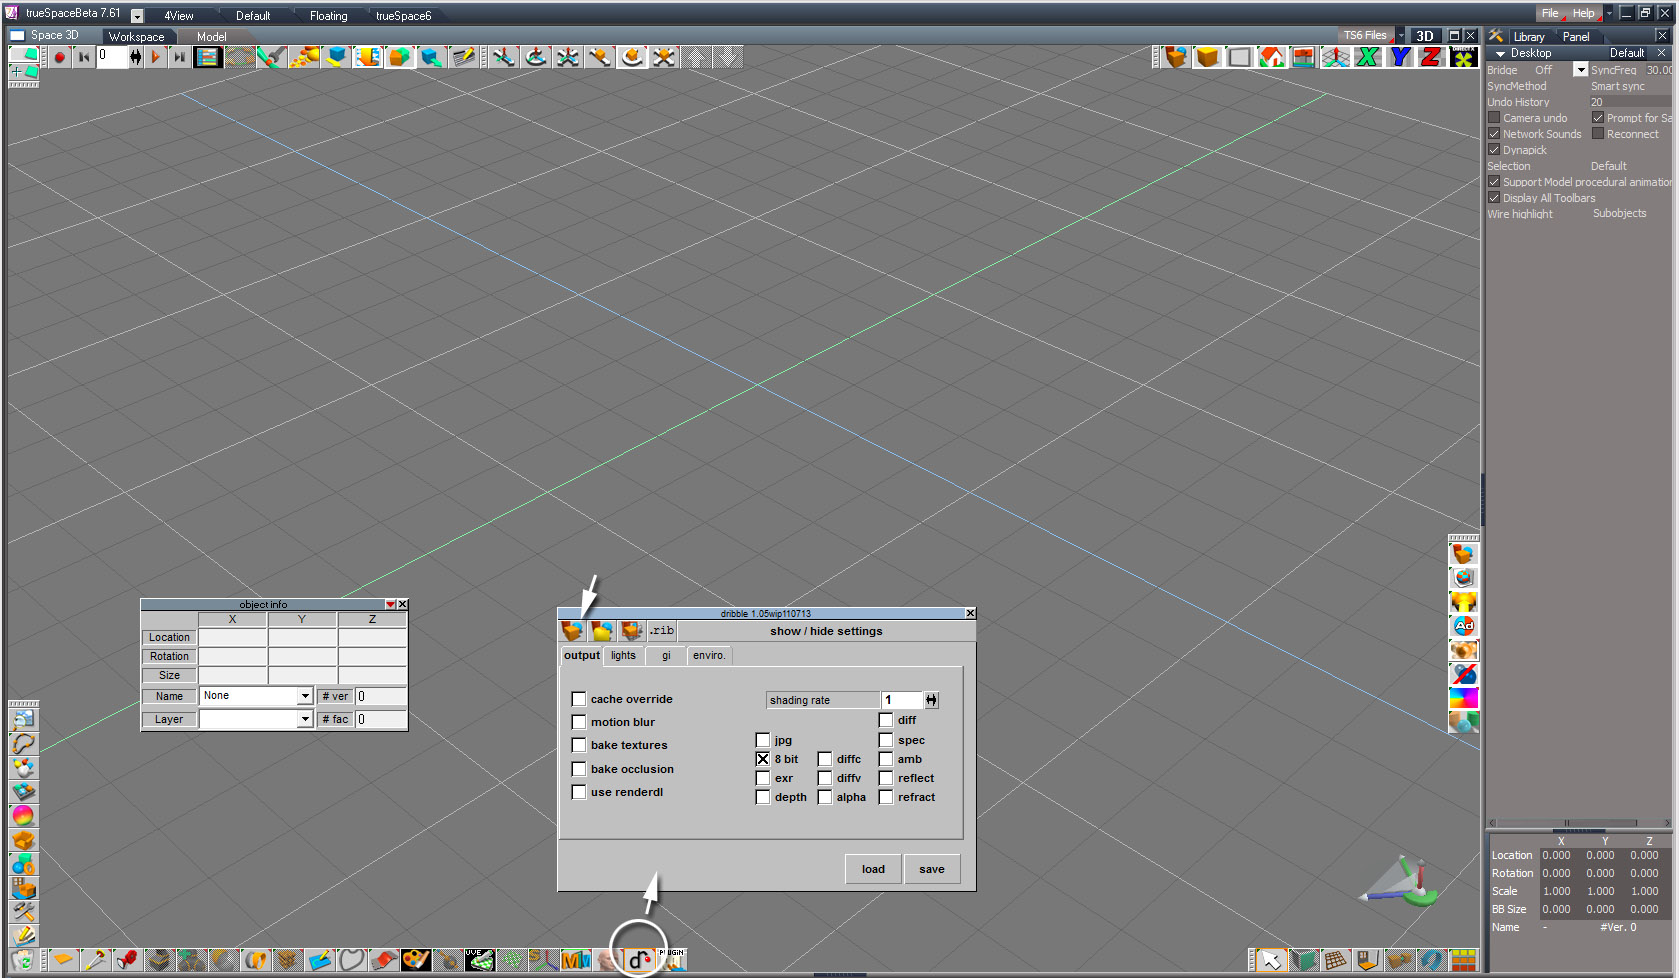
- Start trueSpace, clic the add extension icon, go to your tsx/dribble folder and pick up the dribble1.05 tsx. This icon will give access to 3Delight’s options panel and render/render-to-file buttons.
2018 UPDATE : In this zip file, you will find 3Delight version 11. Use 3Delight V11 if you experience issues with version 10.
Dribble’s plugin should allow for other render engines integration. Its source code is available here.
To use 3Delight, clic the Dribble plugin : this will open a toolbar. This toolbar is offering 4 icons, to Render the screen, Render to file, Render a portion of your screen, and export the scene in .rib format. A large button opens the options panel.
VRay
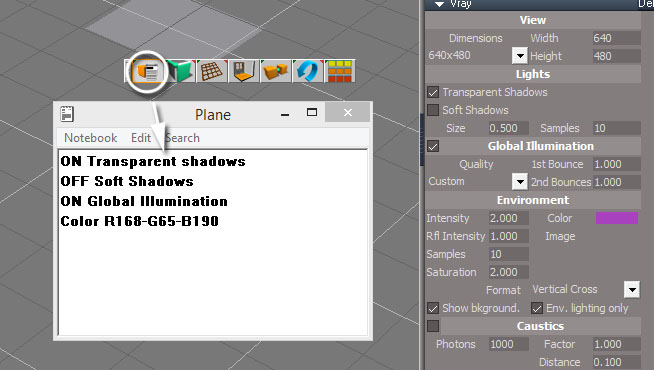
V-Ray is the well known professional render engine from Chaos Group. V-Ray for trueSpace is a special version that brings the legendary fast global illumination into our favorite 3D program. It is the best choice for architecture rendering.
V-Ray’s installation is done via Workspace’s plugin installation. See the tutorial below.
It can work both from the Modeler and the Workspace sides. The video is showing how to render from the Workspace side.
To render a Modeler scene, open the Preferences panel, as explained for Virtualight above but select V-Ray as render engine instead. Next, simply use Modeler’s Render icon to run. Notice that Workspace and Modeler render icons look exactly the same ; only their toolbars are different : Workspace toolbar is at the bottom of your work space by default, while Modeler toolbars are visible in a Modeler view only (get it by clicking the Model tab or trueSpace6 tab).
- Although V-Ray uses most of trueSpace’s shaders, it will interpret them on its way. So a scene built with Lightworks in mind may look slightly different when rendered with V-Ray. Note that some Lightworks shaders may not work at all because they can’t be translated, while some new shaders will appear in the library such as Fresnel, SSS or Glossy.
- V-Ray’s options panel opens in the Stack View. From the Modeler side, you call/open this option panel with a right-clic on the Render Scene icon. This options panel bypasses some of the render options you may have set in Modeler’s tools.
- V-Ray renders in the Modeler view, but it first crosses the Bridge (although it is turned off) even if it is not obvious if your interface is showing the Modeler 3d view only. Therefore, you may experience some translation issues. The most common is the « ghost objects » bug : if you have an old scene in the Workspace side, and try to render an other scene in Modeler, then some objects from the Worspace side may render, because they share the same name of some Modeler scene objects. To avoid such issues, just reset the scene in the Workspace side (use the Main menu to set File>New_Scene).
 V-Ray’s render options are NOT saved with the .scn scene file. To keep your V-Ray options information, I recommend you add in your Modeler scene an invisible object, call it « V-Ray options » for example and use the Object_Note_Editor tool to attach some text notes to that object. This is a simple trick what will help to keep track of V-Ray settings if you need to re-work on a scene later.
- If you render a walkthrough animation, where the point of view is updated at each frame, you can work in a Modeler-only environment. But if your scene only shows an object animation, then you may see the object’s frame 0 rendered only ! This is a known bug that has never been fixed. It requires you to open a Workspace 3D window (even a very small view). The existence of this additional view will force the Bridge to refresh at each frame.
Yafaray
Yafaray render engine can produce very realistic images at the cost of quite long render times. It works from Workspace side only.
Installation files and tutorials are located on its dedicated website.

DirectX


DirectX is Workspace’s real-time render engine. To render one frame or an animation, just clic the Render_to_file icon, located by default in the bottom-right toolbar of Workspace’s interface.
Explore the postprocess’s realtime filters in the Setting tab of the Stack View to achieve stunning pictures, rendered in seconds ! 